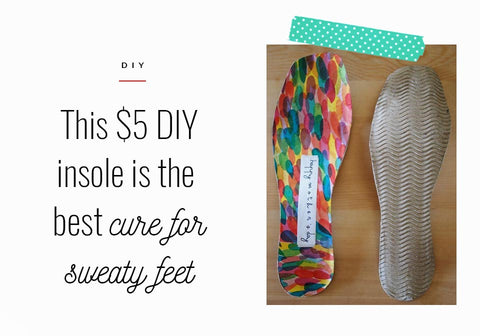
First things first- Sweaty Feet Facts:
Sweaty feet- we've all got them! And no wonder, as our feet have over 250,000 sweat glands producing half a cup of sweat every day. Millions of people live with some variation of hyperhidrosis, usually in combination with Axillary Hyperhydrosis (underarm sweating) and Palmar Hyperhidrosis (sweaty hands). It is assumed that people with Plantar Hyperhidrosis (sweaty feet) also have Palmar Hyperhidrosis, making them 25% of all hyperhidrosis sufferers. The important takeaway here is that you're not alone!
Sweating is our body's response to overheating, but this natural reaction gets a bad rap because we associate sweating with smelling bad, and react to it with embarrassment and disgust.
If you find yourself slipping in your shoes and feeling distressed at how much your feet sweat, take heart, it's not you, it's them: most shoes aren't made to allow for airflow through the foot, and even the ones that do, like sandals, do not absorb foot sweat well. The results can range from mildly uncomfortable (such as when you find yourself struggling to hold on to the footbed of your sandals with your toes) or downright hazardous (like when a loose high heel shoe causes you to wobble, trip and fall)
While a number of over-the-counter topical gels and powders claim to help cure and stop sweaty feet, committing to applying them daily and repeatedly is a hassle.You might also be concerned about staining the soft suede lining or leather interiors of your shoes. The most extreme solutions out there involve surgery- a testament to how distressing the effects of hyperhidrosis can be. These options may not be ideal for those who seek a non-invasive, non chemical solution.
A simple $5 (and some elbow grease) solution for your feet:
Enter these super useful peel and stick DIY insoles that take no more than 15 minutes to make. Remember how most shoes do not allow your feet to breathe, and do not stand up to feet sweating well? These insoles help by allowing you to pick the best lining for your heels (scroll down to read more about best lining materials for your shoe insoles).
Your DIY inserts will be versatile enough to be tailored to your needs (we even have a version in cardboard!) and stop the most persistent and irritating results of sweating feet. At less than $5 a pair, we think they might just be the perfect solution! Let's jump right in~

For this project you'll need:
- Pinking Shears*
- Cardboard/ piece of paper
- Newspapers
- Cloth in a pattern of your choice** (at least 42 x 60cm/ 16.5 x 23 inches)
- Sticky back foam sheets (like these ones from JoAnn's or any craft stores)
- Super 77 Spray Adhesive (Elmer's or any other spray glue will also work)
1. Iron your fabric flat if it's wrinkled or bunched up.
2. Create a rough template of your insole by tracing your shoe laid flat on to a piece of paper or cardboard. Cut out the resulting shape.
3. Use your cut out cardboard/paper shape template to trace two mirroring shapes onto the non-sticky front side of your stick back foam. Cut the shapes out
4. Line the floor or your table top with newspaper, and place the foam shapes you have just cut out on the newspaper, non-sticky side facing up. Spray with Super 77 Adhesive Spray.
5. Place your fabric over the foam insole shapes, and trim away excess fabric.
6. Voila! Trim your new insoles down to fit into any pair of shoes you want. Install them by removing the cover of the sticky back foam and pressing down.
